
Instructions
1. Click the "Go To Advanced View" button on the Process Menu.
2. Select the Responsible Party by clicking the circle at the beginning of the row.
- Responsible Parties are alphabetized by Description. You can reverse sort by clicking the "Description" column header. Scroll down the page to find the Party.
- Use the "Search" field in the upper right hand corner to narrow your choices.
- Use the "Filter" drop-down to display "All," "Active Only," or "Inactive Only."
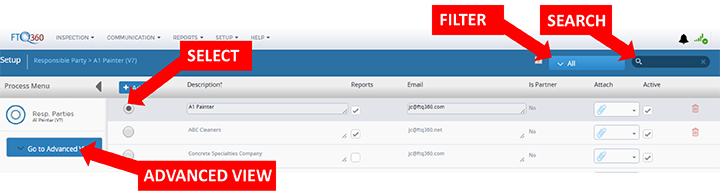
The Advanced View will expand the menu for the column headers to provide additional Setup Options.

3. Code - Enter the "Responsible Party's Code" or leave as is. You can input your own code from accounting records, or use the default code generated by the system.
4. Type - Select the Responsible Party "Type" from the drop-down menu. It will be:
- Material Supplier
- Subcontractor
- Third Party Inspector
5. Description - Type the company name of the Subcontractor/Responsible Party in the “Description" field. Responsible Parties can also be companies or individuals, but in most cases, you'll want to track the performance of a company instead of a single individual.
6. Reports: Select the "Reports" checkbox if you'd like Responsible Party reports sent to the email addresses associated with this RP.
7. E-Mail: Add an email address or addresses. These email addresses will pre-populate on the Immediate Notification inspection email form when emailing inspection reports from the inspection entry screen. Separate multiple emails with a semi-colon ";".
8. Notes - You can enter additional information (such as crew names, a main contact, etc.) into the "Notes" text box.
9. Category - Select the Responsible Party "Category" from the drop-down menu.
- This is generally the Work Class Classification, such as a Trade or Position.
- You can use the Search Field at the top of the drop down to narrow your choices.
10. Is Partner denotes whether or not this Responsible Party is a "sharing" partner with another FTQ360 account. Partner Status cannot be changed on this screen.
- If marked "Yes" it means the Responsible Party is sharing information with another FTQ360 account in real time, as if the sharing partner was logging into the other Partner's account.
- For example, a subcontractor can be a sharing partner with a home builder.
11. Attach: To add an "Attachment," click the paperclip to open the drop-down list. You can select "File," "Link," or "Note," depending on what you want to attach.
- "File" will allow you to upload a document from your computer.
- "Link" will allow you to post a URL to a webpage.
- "Note" will allow open a dialog box where you can type a message.
Open Responsible Party Attachments: A Responsible Party with Attachments has a toggle icon on the left-hand side of the Responsible Party row. Click the icon to toggle it down and you'll see the attachments.
Delete Responsible Party Attachments: Delete the attachment by clicking the light gray trashcan icon to the far right of the attachment.

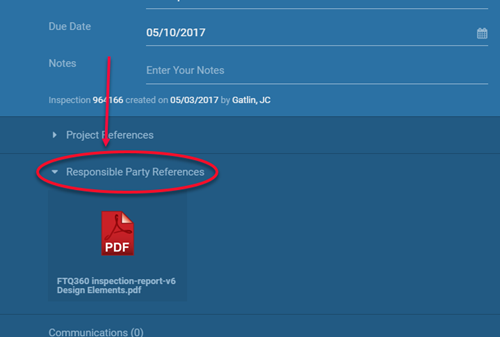
Responsible Party References: Attachments you add to Responsible Parties are displayed as "Responsible Party References" on the Inspection entry screen. They will be located at the bottom of the blue header area. Use the click the toggle icon to the downward position to view and open the attachments.
12. Active: The Responsible Party will automatically be checked as "Active." If you don't want to make it active yet, click the checkbox to remove the check mark.
13. Delete: You can delete the Responsible Party by clicking the red "trashcan icon."
- If there is no trashcan icon available, it means the Responsible Party has been associated with an inspection and thus the Responsible Party cannot be deleted. You can de-activate the responsible party or delete the inspection(s) and then the RP if you want to stop the responsible party from being visible to inspectors
14. Click the "Save" button towards the bottom of the screen to save your new Responsible Party.
Comments
0 comments
Please sign in to leave a comment.