
WARNING: Download and Save a copy of your current Crews/Users File before Importing a new one.
Be very careful when uploading data into FTQ360. Importing data files can not be undone.
Instructions for Downloading your current Crews/Users File
1. Go to: Setup > Responsible Party Setup Process.
2. Select the Responsible Party.
3. Click "Crews" from the Process Menu.
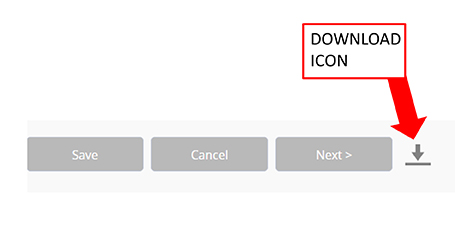
4. Click the "Download" icon at the bottom of the Crews page.
Note: You must have "In/Out" Permissions to see the Download Icon. This will download a spreadsheet titled "crew_users (date and time).csv" to your computer.
5. Save the file to your computer as a backup you can restore if there is a problem with your import.
Instructions for Editing your Crews/Users File and Importing
1. Follow the instructions above to download the file.
2. Open the csv file.
- You'll see category headers along the top row. You may need to adjust the column widths to read each header.
3. Save a back-up of "crew_users (date time).csv." You should copy and rename the file as "crew_users_new.csv" before you enter new data. You can choose a different file name; however your file must start with "crew_users*.csv".
4. Input your new data in the appropriate columns. Refer to the "Spreadsheet Column/Field Guide" below.

SPREADSHEET COLUMN/FIELD GUIDE:
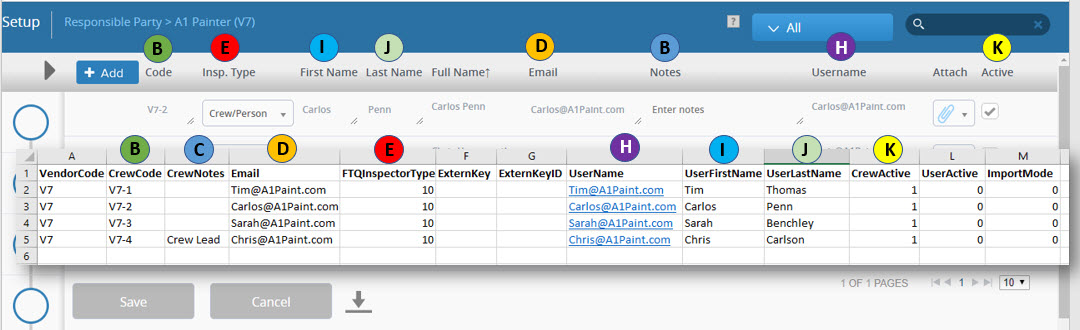
- A - Vendor Code*: Identifies which Responsible Party the crew works for, 50 characters max
- B - Crew Code*: A code that uniquely identifies the record, 50 characters max
- C - Crew Notes: Text field, 4,000 characters max
- D - Email*: Crew Member/User's email address to receive reports & notifications, separate each address with semicolon
- E - FTQ Inspector Type*: Select the Crew Member's job title. Most Crew Members should be set to "10 - Crew/Person"
- 1 - Superintendent
- 2 - QA Department
- 3 - Client/Customer
- 4 - Subcontractor
- 7 - Safety
- 8 - Third Party
- 9 - Project Manager
- 10 -Crew/Person
- 11 - Management
- 12 - Inspector (Gen.)
- 13 - Foreman
- 15 - Supervisor
- 16 - Lead
- F -Extern Key: Used for tagging import with data source; 254 characters max
- G -Extern KeyID: Used for linking to key in data source
- H - User Name*: A unique word to be used to login to FTQ360; recommend using crew member email address; 50 Characters max
- I - User First Name*: Text field; 50 characters max
- J - User Last Name*: Text field; 50 characters max
- K - Crew Active*: 0 - Inactive, 1 - Active
- L - User Active*: 0 - Inactive, 1 - Active
- M - Import Mode*: Use 0 for imports (1 overwrite all fields even when column is NULL)
0 = ignore empty values,
1= use empty values in update script
* Required Field
The spreadsheet headers line-up to the categories at Setup>Responsible Party Setup Process>Crews. In the graphic below, you can see where your data populates. You will be able to view all your imported data in the Advanced View.
7. Format your data as "text." This is important. If you open the csv file in Excel, numbers may change into dates, along with other anomalies. It's best to format the data on your spreadsheet as "Text."
8. Save your spreadsheet as "crew_users_new.csv or another name beginning with "crew_users." The file type must be saved in CSV format. This is important.
Next you're going to upload your new spreadsheet (crew_users_new.csv) into the FTQ360 system.
Instructions for Importing your Crews/Users File File
1. Go to: Setup > Administration > Import on the menu bar. (Web screen Import is available for 10 user or more plans - contact customer support if this feature is not activated.)
2. Click the "Choose File" button to select your new spreadsheet (crew_users_new.csv) from your computer.

3. Click the "Submit" button at the bottom of the screen.
4. Check that your files imported correctly. Your imported Crew/Users should now appear under Setup>Responsible Party Setup Process>Crews.
Comments
0 comments
Please sign in to leave a comment.