
“Project” and “Community” are interchangeable labels for the location where work and inspections are performed. Depending on your industry, you will see one of the two labels displayed in the software. Video tutorials are available at the end of the article.
This is the old Project Setup Screen. A new & improved project setup screen was published in 2022.
Instructions
1. Go to: SETUP > Project/Community Setup Process
3. Click the “+Add” button to create a new Project/Community.
- The highlighted fields are required.

4. Description: Type the Project name in the “Description" field.
5. Reports: Select the "Reports" checkbox to have Project/Community reports sent to the email addresses associated with the project.
6. Email: Enter the "Email Addresses" that will receive reports for this project/community. Separate multiple addresses with a semicolon ( ; ).
7. Private Notes: A Private Notes column lets administrators add notes that do not appear on inspection reports.
8. Attach: To add an "Attachment," click the paperclip to open the drop-down list. You can select "File," "Link," or "Note," depending on what you want to attach.
- "File" will allow you to upload a document from your computer. (Attachment downloads are limited to a maximum of 250 mb.)
- "Link" will allow you to post a URL to a webpage.
- "Note" will allow open a dialog box where you can type a message.
Open Project Attachments: Projects with attachments have a toggle icon on the left-hand side of the project row. Click the icon to toggle it down and you'll see the attachments.
Delete Project Attachments: Delete the attachment by clicking the light gray trashcan icon to the far right of the attachment.

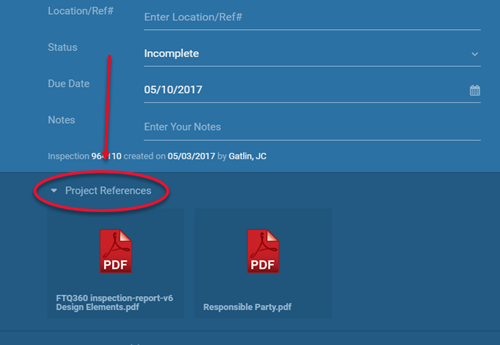
Project References: Attachments you add to projects are displayed as "Project References" on the Inspection entry screen. They will be located at the bottom of the blue header area. Click the toggle icon to the downward position to view and open the attachments.
9. Active: The Project/Community will automatically be checked as "Active." If you don't want to make it active yet, click the checkbox to remove the check mark.
10. Delete: You can delete this Project/Community by clicking the red "trashcan icon."
- If there is no trashcan icon available, the Project/Community cannot be deleted.
11. Save: Click the "Save" button to save your new Project/Community.
12. Sticky Filters on Setup Screens - When you return to one of the setup screens, FTQ360 will remember where you were and return you to that screen. For example, if you were in the Permissions area the last time you went to User Setup, then FTQ360 will take you back to that screen the next time you select User Setup Process on the Setup menu.
- To Clear filters - Close your browser tab.
- The following selections persist until cleared by the User or browser tab is closed:
- The page that you were on
- Button/Mode Filters- "All" selection (All, Active Only, Inactive Only)
- Universal Search box characters
- Sort order of grid columns
- Number of items to display per page (e.g. 5/10/20)
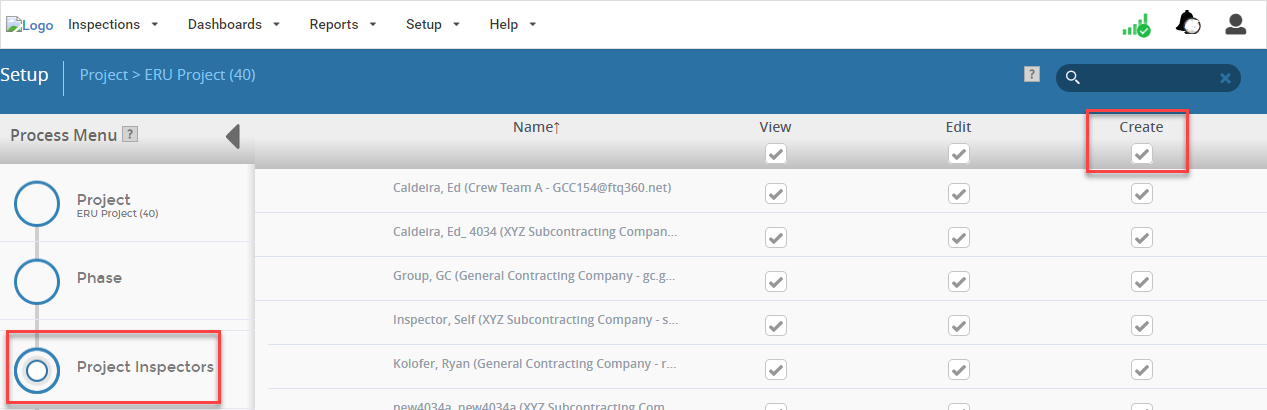
13. NEW! Once the project is added, click on Project Inspectors from the Process Menu on the left hand side of the screen. Choose which users should have "View," "Edit," or "Create" permissions by checking the box in the appropriate column.

- View - gives the user the ability to view inspections in the community, but cannot edit or create inspections.
- Edit - gives the user the ability to view and edit inspections, but cannot create new inspections.
- Create - gives he user the ability to view, edit, and create new inspections.
- If no boxes are checked, the project will not be visible to the user at all.
See Define Project Inspectors for more information.
Advanced Setup Options
The following Setup Options are available under the "Advanced View." Not all users can view or access these options. Please contact Customer Support for assistance. Click on the action title for more information.
> Add Project Notes and Information
Video Tutorials
Setup a Project (12:15)
Comments
0 comments
Please sign in to leave a comment.